Blog

A blog about my the history, acquisition and operation of my 1911 Model 62 Stanley Steamer.

All wrapped up

I'm happy to say that I have successfully re-insulated the boiler with modern ceramic insulation. It was a big job but well worth the effort. I also replaced the main and pilot fuel lines with small 3/16" and 1/8" stainless lines well I had the smoke bonnet off. A substantial reduction from the 5/16" and 1/4" copper lines that I had been running. I had assumed that these changes would have decreased the operating pressure that my steamer would be running at. My thought pattern is as follows. If you decrease the line diameter and length, when the steam automatic cycles off there should be less fuel in the lines to clear out and thus shut the burner down down sooner. This should lower the operating pressure of the automatic.

In practice this is not the case. The main burner cycled off at much the same pressure as always. However there was an interesting side effect to re-insulating the boiler. After the main burner cycles off the insulation actually holds the heat so well it increases my steam pressure by an additional 50psi. A welcome surprise if I do say so myself.


That darn piston!

I decided to to take the Stanley out on a day trip out to visit the Moon club. It was a  short trip, 35 miles maybe, and would provide a great opportunity to see how the car would perform. It started with a bunch of stray vapor but no issues and seemed to be alright. The pilot was staying lite after some modifications I had done to it which was a real treat. I made it to within a mile of the destination before a a started to hear a slight knocking sound when I was coasting. It seemed that the slower I went the louder the sound got. At first I reasoned it could be something in the pump drive linkage making noise but quickly came to the conclusion that it has to be coming from a much larger source. I finally a arrived at a stop light and when I went to pull away the car made a very distinct noise that I had heard before when one of the pistons had backed off and was hitting one of the plugs!! So that ended my day driving the Stanley and I had to send Ken in his 1912 Oakland back for a truck and trailer.

 I must admit it was a big disappoint to have not made the trip under my own steam. I was luck enough to have invited a close friend for company so at least the 40 minutes of waiting on the side of the road wasn't so bad.

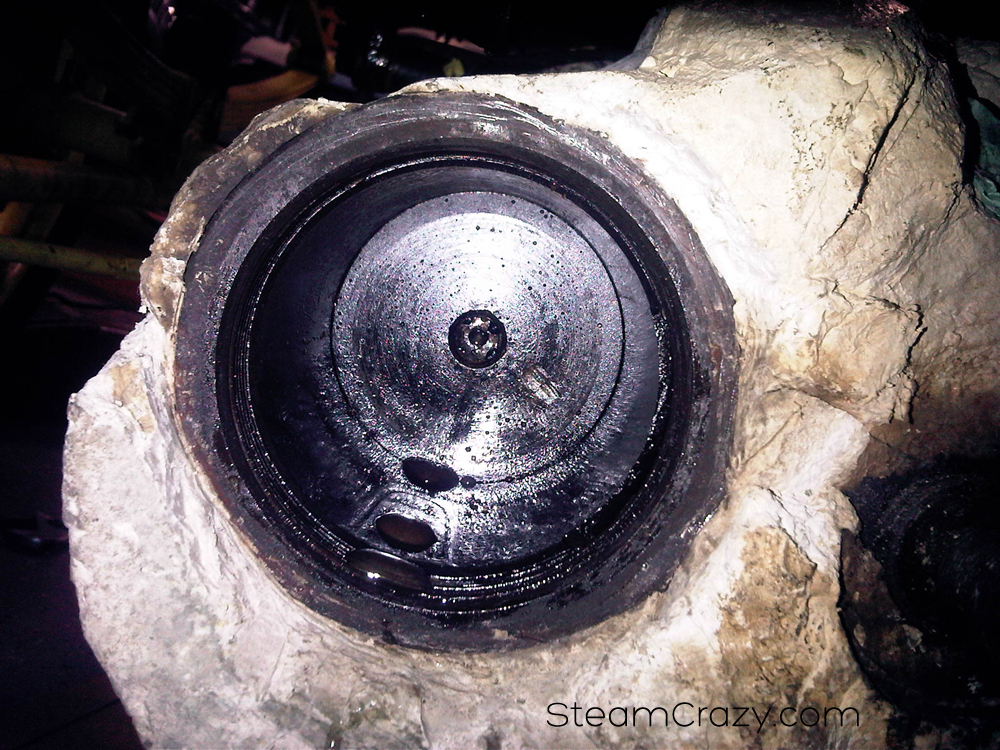
 Once back in the shop, I stripped the engine cover back off, chipped away the RamKote, and opened up the drivers side front bung. Sure enough the piston had backed off almost two full turns!!! That is a lot more the the last time and an issue that needed a permanent remedy. After discussing with Pat Farrell, I decided to put some weld on the top of the rod and peen it over so the piston couldn't unwind itself again. I had attempted to peen the rod over the last time the piston backed off but it turns out that there wasn't enough material sicking out past the piston to hold it. Needless to say after about 7 hours of work spread out over a couple days I had the Stanley all buttoned back up.

  A side note for Stanley owners: It had crossed my mind to just put a bead of weld between the piston and the rod to hold it together. I ran this idea past Pat and he informed me that he had accidentally done that many years ago thinking that it would probably be fine. It lasted about a year before the piston broke apart. We all know the proper way to weld cast iron and if that isn't achievable we just shouldn't do it.


Insulating the Steam Lines

Unlike an internal combustion engine, heat is your friend. You try to preserve all the heat you can to increase efficiency. One of the methods used to accomplish this is to insulate all of the hot water and steam lines. We decided to to use a 6 pound ceramic blanket as the primary insulation and then we wrapped it with 2" wide fiberglass tape. The insulation was then held in place with steel hay wire.

This was a dusty job with bits of fiber fiberglass ended up all over the place. My lucky lady ended up doing a lot of this wrapping which I am extremely grateful for! It also explains why it looks so nice.

The burner is insulated and on the car!!!

This has been a long road but the burner is finally bolted under the boiler. I insulated it using Ramkote 1200  between the burner liner and the outer pan. The grate itself was insulated using Fiberfrax. I would estimate that the insulation added twenty pounds to the burner assembly. The amount of modifications needed to make the pan fit properly becomes quite apparent now that the whole thing is assembled. The fitment of the pan is very tight around the outside diameter of the boiler so getting in place was a difficult balancing act with two floor jacks and a wonderful girlfriend.